Building an RF Receiving Station
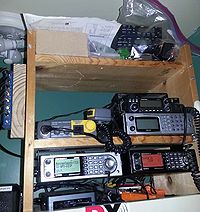
Myself and other friends enjoy using scanners and now SDR's to find interesting radio signals to monitor. At Bloominglabs we have a receiving station we've been continuing to work on and improve for a while. It's been a fun and rewarding project which we keep finding new things to expand it with. The first part of scanning involves getting an antenna in the air. Then it's a matter of getting it connected to your gear. There are a lot of components to making this work correctly. This project is open ended and experimental so we need to be able to split the signal between a number of receivers. The purpose of this page is to document some knowledge learned during this process and help anyone interested in doing the same thing.
Contents |
Antennas
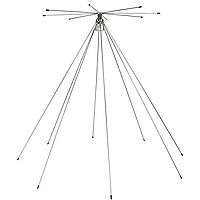
I bought a generic wide-band discone antenna several years ago for Bloominglabs to hook up to a radio scanner. Discones are good for receiving because they are omni-directional and they can cover many frequencies. They can also be used for transmitting but they are not as optimal for this as a proper tuned antenna for the band you are transmitting on. We moved this antenna from our last building to our current building as of 2018. Obviously height is an important factor, ours is on a 10' mast mounted to the side of our building. Our elevation relative to surrounding buildings is not great, but with the mast raised we get reasonable reception of a fair amount of spectrum.
Connectors
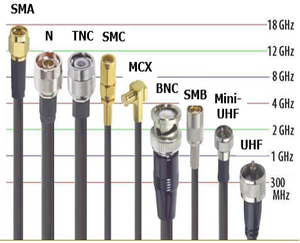
RF connectors are mainly selected for 2 criteria: RF losses in dB and weather resistance. Losses are always more important the higher the frequency you go. If you want to work with RF over 800MHz then you want very low loss connectors and coax. Most discone antennas have UHF or SO-239 (female) connectors on them which mate with PL-259 (male) connectors. UHF connectors have reasonable performance for VHF and UHF frequencies but N-connectors are much lower loss and much more moisture. N-connectors are just about always found on S-band (2.31 to 2.36 GHz) and higher rated gear because they inject the lowest losses. You can use N-connectors for any system and in fact it's a good idea if possible, they're the best of both criteria. However UHF is more common, especially on discone antennas. Some scanners and equipment use BNC and other lower quality connectors too.
For our purposes I started using SMA connectors for as much as possible which are good up to 18GHz. Most smaller RF equipment like handheld radios and SDRs use SMA already. They are reasonably good at RF noise rejection, have low losses, and are cheaper than N-connectors. They have a side-benefit of being physically smaller which has other benefits when selecting a splitter. Bought in bulk they can be had for just a couple dollars a piece.
A lot of RF gear also uses BNC, F-connectors, and other less common connectors. I've used a number of these over the years along with adapters. With the main feed and splitter for our receiving station we're tried to avoid anything but UHF, N, and SMA connectors. Once the feedline reaches the distribution point it's less critical, but using as low as possible loss connections to that point improves signal quality for all final devices connected.
Don't let this chart fool you. Just because UHF *can* be used up to about 1GHz does not mean it's the best choice for your application. SMA and N-connectors will still give you better performance if you will be working with 800-1000MHz frequencies. However if you are only working with the 2m and 70cm ham bands then UHF connectors are fine.
Coax
You want the lowest loss feedline to your antenna as you can afford, especially if you want to work with frequencies higher than 800MHz. For this antenna we went with LMR400 which has very low losses at higher frequencies. We had a donation of a bundle of RG-8x at one point so we used a bunch of that for jumpers and smaller runs of coax as needed.
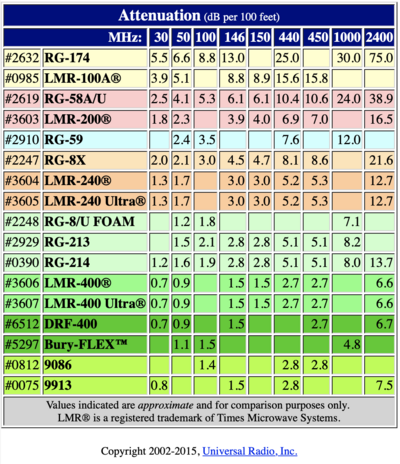
https://www.universal-radio.com/catalog/cable/coaxperf.html
Note that there are two main diameters of non-TV coax, the thin stuff and the thick stuff. "Thin stuff" is RG-8x and LMR-240. "Thick stuff" is RG-213 and LMR-400. Generally crimp-on connectors fit these two sizes of coax. Obviously there are other sizes too, but especially for budget minded folks these are the two diameters you will be working with. Obviously RG-58/RG-59 and other TV grades of coax are not appropriate for use as it has a different impedance and will cause problems.
Budget coax jumpers and crimp tools
It does take some practice but if you want to be as budget minded as possible then making your own coax jumpers is the only way to go. Crimpers sold for RF use are often expensive, but you can get them cheaper if you know what you are looking for. You want a standard ratcheting crimper which will last a long time, avoid single size crimpers without replaceable dies as they are usually weaker and may not fully crimp, and the tools can wear out pretty fast. Also, look at the cost of a crimper and die set spread across the cost of all the connectors you plan to use it for versus buying your coax jumpers pre-made. If you need more than just a few jumpers you will come out ahead. And being able to fix bad connectors on used coax and being able to make jumpers exactly to size is a nice benefit.
Several companies sell compatible ratcheting crimper tools like these which can have the dies replaced:
- Voilamart Insulated Wire Crimper - $12 via Prime, same tool other companies sell for over $100 elsewhere
Paladin, Datashark, and Greenlee crimpers are also compatible with the same dies. Bigbox stores usually carry these crimpers from $30-$40. The tools all have a ratcheting action and a similar look with the slightly off-set head. There is a star washer and screw adjustment on the side of most of these crimpers which allows you to set the depth of the crimp. I don't think I've ever had to mess with this.
Now you need dies for the size of coax you will be crimping. These dies include crimps for both the external shell and the center conductor. They are all compatible with the above crimping tools:
- Crimp dies for LMR240/RG-8X - $25 plus shipping
- Crimp dies for LMR400/RG213 - $20 plus shipping
Obviously you will need to remove whatever original die set was in the budget crimper you found and replace it with the above dies. We needed both sets in order to be able to make our own LMR400 ends as well as RG-8x jumpers. I recommend soldering the center conductor lug on though rather than crimping as I've found my crimps on these to not be 100% reliable. The outer shell can be crimped though of course.
For coax strippers I highly recommend a trusty pocket knife and nothing more. Any cheap razor-blade based tool I've ever used never can cut the outer shield without nicking something inside. With a little practice you can get this right the first time every time. Another important note is that the metal sheath of the metal connector should only go under the coax shield braid, it should not slip under the outer sheath at all, the outside crimp ring will not fit otherwise.
Moisture and coax
Moisture is the enemy of coax, it will slowly degrade outdoor runs over time. Moisture gets into coax through the connectors, for outdoor runs its good to wrap the mated connector set with coax-seal which is a tar-based product. I've not had success with the silicone-based wrap tapes. It's possible I just don't know how to use those right, but I've tried several times and failed each time to get the tape to lock in place.
Crimping coax RF connectors
More info with pictures to come.
Multicouplers/Splitters
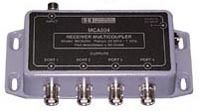
Obviously we want to hook up a lot of gear to this antenna setup. Splitters are expensive, but if you know a little more about them you can get some excellent deals on better equipment than usual scanner splitters. Most people know about this unit here:
- 4 Port MCA204M VHF UHF Receiver Multicoupler - $200 new
Notice that it uses lower quality BNC connectors, and it's expensive. With a little bit of knowledge you can easily dig up much better splitters on Ebay at a fraction of the cost of the above unit.
Power Dividers
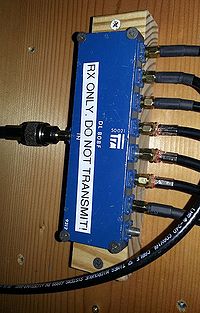
Splitters and multicouplers are apparently called power dividers by RF engineers. An ideal power divider perfectly splits (or combines) the input signal between all of its output ports. It should also electrically isolate each port so even a short on one output will not reach any of the other ports. Last but far from least, it should work for the entire band of RF spectrum you intend to receive. In our case we want everything under 1GHz to be available since we're just experimenting and don't know what all we intend to receive. You also need to consider the connectors the power divider uses, in our case I wanted SMA connectors which simplifies the number of connectors I need to carry for each coax type.
So, knowing some new terms now, if you go to Ebay and search for a power divider you will get a ton of surplus government equipment. It's very important that the divider works for the RF band you need to cover. Most dividers are for microwave equipment and don't go below .5GHz (500MHz). However the equipment does exist if you are persistent. Find a divider with the number of ports you want and then verify it works for your RF band. For 4 and under ports there are usually lots of dividers that work from 50MHz to 1000MHz. This is a wide-band power divider. Also, on the surplus market these often go for less than $50. However, do NOT be tempted to buy a divider if you can't positively confirm the frequency range the divider supports. Sometimes you can google up results from the manufacturer if the Ebay auction lacks these details.
What about "combiners"? These work just fine as a divider and can be used interchangeably both ways. Also, most dividers will have a power rating in Watts and a VSWR measurement. You don't need to worry about these ratings since you are only receiving with it. If you happen to need a combiner to feed multiple antennas together a divider will work fine.
LNA's and filters
At this time we have our system ready for an LNA but have had some difficulties getting an LNA working. I'll update this once we get this situation resolved.
An LNA is a Low Noise Amplifier and this can greatly help with weak signal reception. An LNA should be installed as close to the antennas as is possible which requires mounting it outside at the top of your antenna mast. This means you'll need a weather proof enclosure as well as a way to deliver low-voltage power to the LNA. It also complicates the antenna mount, especially for a discone antenna which typically has coax attached up through the mast pole itself. Here we will document our configuration.
Selecting an LNA
There are many kinds of LNA's so you need to do your research. Make sure it covers the frequency band you wish to cover.
Also, an LNA is similar to but different from an LNB. An LNB is a "Low Noise Block" Downconverter which while containing an LNA, also takes a high frequency signal and down-converts it to an easier to handle frequency. This is how devices like DirecTV dishes get away receiving S-band frequencies but still using cheap RG-59 coax to send the signals to your receiver box inside the house. It converts all the high S-band frequencies to UHF frequencies which are much less lossy over cheap coax.
Installing an LNA
For such a simple device, it takes a lot of work to facilitate the use of an LNA on an outdoor antenna. This is how our system is setup.
We cut a 2' section of mast pole off for the antenna to mount directly to, then attached this short section of pole to the main mast pole using U-bolts. We used a short 4' section of coax (LMR400) up through this short section to connect to the antenna. Then the coax goes up into a weather-proof enclosure. The main coax feedline (also LMR400) also terminates inside the weather proof enclosure. We used a 4"x4"x4" PVC weather proof enclosure which had mounting feet intended for mounting to wood. We used hose clamps to attach the feet of the enclosure to the main mast pole.
LNAs mostly use SMA connectors. In order to reduce the number of adapters in the path between the antenna and the radio gear we put SMA connectors directly on the LMR400 coax. This looks kind of funny but works fine.
This is an important point: LMR400 coax is very thick and rigid. LNA's are typically small and fragile. My first attempt at inserting the LNA between two pieces of LMR400 failed miserably. The kinetic energy stored in the bends of the coax was enough snap the PCB of the LNA in half once attached. Thankfully I was able to repair the LNA with a bit of soldering, but obviously strain relief was required inside the weather proof enclosure. I ordered a short 6" pigtail made with high quality but very narrow coax for one side of the LMR400 connection to the LNA. You still need to be very careful, but this mostly resolved the broken LNA issue.
<picture coming soon>
Powering the LNA
Most LNA's can accept power two ways: externally or through the coax. Through the coax is called a "bias-T" interface, some equipment (including some RTL-SDRs) can inject power into the coax. If your equipment doesn't support power injection, you can get a bias-t injector that just connect in-line with the coax. This can be very convenient, but for our setup I wasn't sure this was going to work through our power divider. In fact, the power divider should block this injected power if it's doing its job correctly. Also we had a concern of that injected power touching all of the other receiving gear connected. So instead we used some cheap silver-satin cable (phone cable) to run power up to the LNA. We're using a 9v wall-wart found in the community power supply bin to power it.
Surge Suppressors
If you are hooking a bunch of gear up to an outdoor antenna then you will need to protect it. "Lightning suppressors" aka surge suppressors will help. Most folks go with Diamond for this as they are the cheapest out there. These are what we use, as far as we know they are reliable suppressors. If money is no object then go with Polyphasor, but that's not in our budget.
- Diamond SP1000 - UHF suppressor
- Diamond SP3000 - 2.4GHz suppressor
The SP3000 uses N-connectors so we went with that to get the better RF performance and lower losses for the entire system. The SP1000 uses UHF connectors. These are both indoor devices, Diamond also makes outdoor units too. Just be sure to note that the outdoor units have both male and female connectors on them (so they can attach directly to the antenna ahead of the feedline). The indoor units have female connectors on both ends which is what you want when connecting to a grounding location with a short pigtail going to your radio equipment.
Also note that direct hits by lightning are not guaranteed to be protected against. However they should protect you against static surges and near hits. Obviously you want the suppressor between the splitter and the antenna.
Grounding the system
We installed an 8' grounding rod to ground our antenna masts, I recommend this for anyone with an outdoor antenna. You will need some cable to connect from the grounding rod to your mast. You also need a good ground from your indoor surge suppressor out to your grounding rod. Most big box hardware stores have bronze grounding clamps for various size pipes along with attachments for grounding rods. There are other schools of thought, but for a simple antenna mast I prefer to prevent static electricity buildup with the intent of preventing a lightning strike.
